Ta Da! The curtains are done. The rod gave me fits though. After I finished the curtains, I hung them on the rod and, while arranging the folds, gave it a bit too much of a tug. And pulled one entire support out of the wall. Four days later, after much spackle and sanding, I put it up again. But since I was impatient to show it to you, I put it in the same place I’d just patched. Brilliant. So it stayed up long enough to post the pictures but that’s about it. I’m going to move the brackets out an inch, but I promise not to bore you with those details. In the meantime, here’s how I got the curtains done… Continue reading…
Category Archives: Home Decor
The Guest Room – part 1
This project is in tandem with, well is the larger part of, the Yellow & Gray Quilt. We have lived in our home for coming up on 8 years now. Our poor guests have had to sleep in the most uninspiring room. It hasn’t stopped them from visiting us, but I expect it has them wanting to be in any other part of the house rather than hiding out in the guest room.
- from the doorway
- southeast corner
Just imagine how much lovelier this room looked when it had the wood duck border around the whole ceiling line. Continue reading…
The Entry Hall
The vinyl tile floor in our entry way was serviceable enough when we moved in to this house, but who really wants the look of a kitchen in the front hall? So I set my annual project to bring the cherry flooring that was in the back of the house to the front.
We already had a supply of cherry flooring from a few years ago when we had the kitchen/family room redone. We used contractors for that. A whoooooole ‘nuther story. And I had put down the floor in M—’s room so I would have practice when a bigger job came along.
- Peeling off floor #1
- But wait…there’s more!
Yellow & Gray Quilt – part 4
I can’t believe I’m only posting update #3 on this project. It feels like it’s been going on forever. Due in no small part, I expect, to the fact that I’m also thinking about how the whole guest room will come together. Continue reading…
The Sun Porch
The year – 2012.
The week – Memorial Day week. (That’s the one where we celebrate the soldiers, not the one where we celebrate the unions and why we all now have weekends off and so forth. But I digress.)
- Old stereo cabinet, now a game & puzzle cabinet.
- The storm door and cafe table.
- The coffee table
Every year on this week, I take off my regular 9-5 and do something major around the house. This particular year was set aside for the sun porch. Most of the time, these projects are just Debby. Not this one. This one was a joint effort of D— and step-daughter M—, who was home from college for a few weeks. Keep reading…
Tiled Coffee Table
This project was done in 2009. It was the beginning of the Sun Porch fix up. The motivation for it – besides the fact that we really needed a coffee table on this big sun porch – was that the side table my grandfather had built howevermany long years ago, had a center tile that I really liked.
But it didn’t go with the table very well, and that table needed repairing. It has a mahogany top and store bought legs. All the seams in the top were splitting, because, as it turned out, he’d glued the top together with no other reinforcement. That’s right folks. No nails or braces of any kind. So in the non-temperature controlled environment of the sun porch, it was coming apart. Continue reading…
The Upstairs Hall
This is what I call a small weekend project. The whole look of the hallway is changed just by painting the woodwork. These pictures show the hallway before. It’s your typical 1970s pre-fab hollow core doors in a disgusting shade of walnut brown. Nothing like it to make the area feel like a cave.
The only door I actually removed was the linen closet bi-fold. Much easier to paint the edges and this was one where the back might show. Continue reading…
Armchair Slipcover
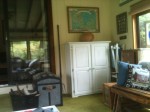
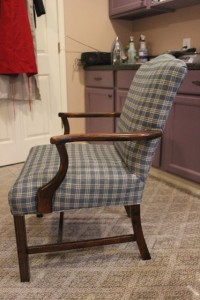
We have this serviceable but old chair that sits on the sun porch. The sunporch was totally redecorated by my husband, 22 year old step-daughter, and me over Memorial Day week 2012. The roof was recently replaced, so there was only one thing left to do. Recover the chair. I had purchased a slipcover for the pillow back sofa. That was too big a project for me to tackle when I could buy a cover for under $100. The chair, however, is not a normal shape. At least, not as far as commercially made slipcovers are concerned.
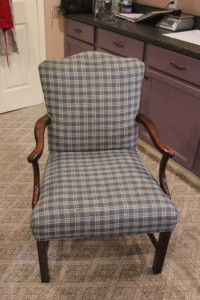
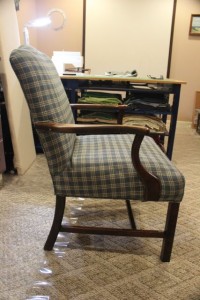
Since I had to buy cotton duck to cover 2 of the pillows for the sofa, I bought an extra 4 yards. It turned out to be exactly enough. I also planned exactly where I would have to put velcro strips to hold the whole thing on. I am not a fan of those adorable little bow ties, and I wanted this to look as tailored as possible.
I did a bucketload of searches online to find instructions for making my own slipcover. The best one I found suggested laying the fabric over each section of the chair and tracing a pencil line along the cording. I pinned the fabric to the chair so it wouldn’t slip, traced the cording and then cut the fabric about an inch bigger than that to have enough for a half inch seam allowance and hopefully a little extra in case the fabric shrank later.
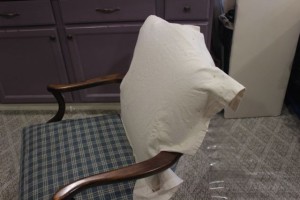
I should, perhaps, take this moment to tell you that I had pre-washed the fabric and dried it in a hot dryer in order to minimize future shrinkage.
I started with the front and the back, not tapering the sides too much so it would be easy to actually slip the cover over the top of the chair. I stopped the seams right above the arms, which I wanted to leave exposed. Continue reading…